Faxing a Form
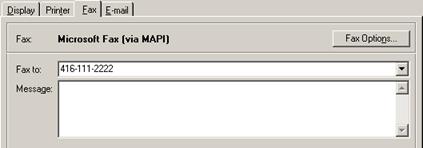
After selecting a form (see Selecting a Form), select the Fax tab to send the form as a fax. The tab will only be enabled if faxing has been configured. Click the Fax Options button to configure fax options (Communication Options - Fax Tab).
TIP If a form
automatically prints when selecting it from the Print button dropdown
list, and no print dialog window appears, then the selected form has been
configured to bypass the print dialog window. To show the print dialog window,
either select the desired form from the File menu since the print dialog
window is always displayed from there (see Selecting a Form from
the File Menu), or select View  Optional Dialog Windows from the main
menu and reactivate the print dialog window for the selected form on the
Print button dropdown list (see Optional Dialog Windows).
Optional Dialog Windows from the main
menu and reactivate the print dialog window for the selected form on the
Print button dropdown list (see Optional Dialog Windows).
If there was a fax number on the corresponding record then it will automatically be entered. Otherwise, manually enter one or more destination fax numbers separated by semicolons (;). Optionally, enter a message to be sent as the first page of the fax. Click the Send button to send the fax, or click the Close button to close the print form window without faxing.
When printing via a fax printer driver the fax number must be entered manually when prompted by the printer driver (see Technical Overview of Faxing via a Fax Printer). The fax number already entered in the print form window will automatically be copied to the Windows clipboard. Therefore, when the fax printer driver prompts for the fax number to be entered, the user just needs to paste the number (see also Using the Windows Clipboard).
NOTE If working with a MySQL database then the name of the database must be configured in the MySQL Connector/ODBC system DSN in order for faxing of forms to work correctly (see Installing MySQL).
(See also Faxing a Report.)
 E-mailing a Form