Attachments
Many entry modules allow files, Internet hyperlinks, digital photographs, or electronic signatures to be attached to individual records from the Attachments tab on the entry window. Attachments may also be made to fax and e-mail messages (see Sending a Fax, and Sending an E-mail).

Any file type or Internet hyperlink may be attached. While electronic signatures are actually stored within the At Your Service database, files and digital photographs are recorded as the path and filename of the location where the file is stored. Therefore, in a multi-user environment it is recommended that all file and digital photograph attachments be stored in folders on a network share that is accessible by all users.
NOTE When mobile edition databases are synchronized with a master database (see Mobile Synchronization), only the references to linked digital photographs and other linked file attachments are synchronized, not the files themselves.
Attachments are not available in the Repair Micro edition.
Attaching a File
To attach a file, click the  button or select File
  New Attachment from the main menu.
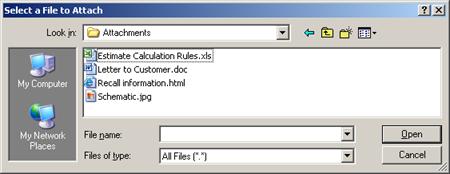
Navigate to the folder where the file you want to attach is located and either double-click on the file name, single-click on the file name and then click the Open button, or type the file name in the File name field and then click the Open button. Click the Cancel button or press the Esc key to cancel without saving an attachment.
Optionally, select one or more files from within Windows Explorer and then drag and drop them onto the attachments file list area of the record being edited. All of the selected files will automatically be attached.
You may also copy the path to a single file onto the Windows clipboard and then paste it into the attachments file list area of the record being edited (see Using the Windows Clipboard). If the text in the clipboard is validated as being a path to a real file, then that file will be attached.
Attaching an Internet Hyperlink
To attach a hyperlink from the Internet, copy the complete URL from the address bar in your web browser program to the Windows clipboard, or right-click on an Internet hyperlink and select Copy Shortcut (or the equivalent command) from the popup context menu. Then paste the hyperlink into the attachments file list area of the record being edited (see Using the Windows Clipboard).
Attaching of Internet hyperlinks is available only for licensed users of version 2.1 and higher.
Attaching a Digital Photograph
While digital .JPG photographs (i.e. with a .JPG file extension) can be attached manually just like other file attachments, they can also be systematically renamed and attached automatically. The digital camera must be configured to save photographs directly to a temporary folder on the computer hard drive, and the temporary and permanent photograph folders must be configured within At Your Service (see Communication Options - Digital Camera Tab).
Start by capturing one or more photographs with the digital
camera. To automatically rename and attach each photograph, click the  button or select File New Photograph from the main menu. The
photograph with the most recent date and time stamp in the temporary photos
folder will be selected for attachment. If the digital camera automatically
creates subfolders then the photograph will be selected from the subfolder with
the most recent date and time stamp. The photograph is then automatically
renamed with a unique filename corresponding to the open module and record ID
(e.g. Photo_R00001234_1, Photo_R00001234_2, etc.), is copied to
the permanent photos folder, and is attached to the open record. Since the
unique filenames must correspond to an already assigned record ID, digital
photographs may be attached using the above procedure only when editing records,
not when adding new records.
button or select File New Photograph from the main menu. The
photograph with the most recent date and time stamp in the temporary photos
folder will be selected for attachment. If the digital camera automatically
creates subfolders then the photograph will be selected from the subfolder with
the most recent date and time stamp. The photograph is then automatically
renamed with a unique filename corresponding to the open module and record ID
(e.g. Photo_R00001234_1, Photo_R00001234_2, etc.), is copied to
the permanent photos folder, and is attached to the open record. Since the
unique filenames must correspond to an already assigned record ID, digital
photographs may be attached using the above procedure only when editing records,
not when adding new records.
To automatically check for and attach a digital photograph every time a new repair order is created, enable the “Automatically Attach Digital Photograph to New Records” module option Repair Order Module Options).
To print attached photographs on repair order forms, set the “Print Attached Photograph Size” option for each form (see Form Options). It is recommended that picture files used for printing have a resolution of at least 300 dots-per-inch.
TIP Many digital cameras default to capturing digital photographs at a very high resolution with large file sizes that quickly eat up disk space and result in slower printing. When printing digital photographs on forms, the full-size photograph must be loaded even if it is scaled to print at a very small size and at a lower resolution (i.e. on a laser printer, not on a photo printer). Therefore, configuring the digital camera to capture digital photographs at a lower resolution that still provides adequate quality — both for printing and viewing — will save disk space and improve printing speed.
Attaching an Electronic Signature
Electronic signatures that meet international ESIGN compliance standards may be attached using Topaz signature pads. Rather than just storing a picture of the signature, the biometric signing pattern (e.g. stroke direction, speed, timing, etc.) is recorded along with the date and time that the signature was accepted by the signer into the document, allowing the signature to be legally traced back to the original signer. Further, each signature is uniquely encrypted and bound to the original record, thereby preventing misuse of signatures or attempts to modify the signed document at a later time.
At Your Service has been designed to work with a variety of Topaz industrial-strength 1-inch × 5-inch signature pad models. Please see www.ayssoftware.com/topaz.htm for a comparison of the various models.
To attach an electronic signature click the  button or select File Attach Signature from the main
menu.
button or select File Attach Signature from the main
menu.
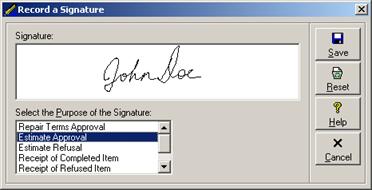
Start signing a name on the signature pad and you will see it graphically in the window as you sign. Select the contextual purpose for the signature from the list and click the Save button to accept the signature. Click the Reset button if you need to clear the signature and start over. Click the Cancel button or press the Esc key to cancel without accepting the signature.
Attaching of electronic signatures is available only for licensed users of version 2.5 and higher, and is not available in the Repair Lite edition.
Opening an Attachment
To open an attachment for viewing or editing, select it
from the attachments file list area of the record being edited, and then click
the  button or select File
Open Attachment from
the main menu. Optionally, just double-click on the attachment from the
attachments file list area of the record being edited.
button or select File
Open Attachment from
the main menu. Optionally, just double-click on the attachment from the
attachments file list area of the record being edited.
Digital photographs and electronic signatures will be displayed in a special viewer window. All other files and Internet hyperlinks will be opened using the default program for the corresponding file extension, if that program has been installed on the local workstation (e.g. .doc extensions will likely open in Microsoft Word or WordPad, .xls in Microsoft Excel, .htm in Microsoft Internet Explorer, etc.).
Deleting an Attachment
To delete an attachment, select it from the attachments
file list area of the record being edited, and then click the  button or select File Delete Attachment from the main menu.
Depending on the general defaults, you may also be prompted to confirm the
deletion request before proceeding (see module option “Display a Confirmation
Prompt Before Deleting” under General Module
Options).
button or select File Delete Attachment from the main menu.
Depending on the general defaults, you may also be prompted to confirm the
deletion request before proceeding (see module option “Display a Confirmation
Prompt Before Deleting” under General Module
Options).
When file and photograph attachments are deleted, only the link to the file is deleted, not the file itself.
 Using a Bar Code Reader